FAQ's
New Features for Summer 2023
Now you can upload all of this week’s camp photo groups all at once (LIMIT IS SET TO UPLOADING 40 OR LESS DIFFERENT PHOTOS AT A TIME) into the Design Tool (they show as thumbnails on the left) and then grab them one at a time to place into your next group photo border. As you apply them to a group photo border and Add to Cart, the image you just added will disappear from the thumbnails left on the left side of the screen so you do not mistakenly add the same image a second time.
Adding the images all up front puts all the upload time for your images done all at once. That way if you have a slow internet connection or lots of images and the upload time is slowing you down, you can use the UMI upload to put all of the time lag at the front end so you can step away until all are uploaded and now you can make efficient use of your ordering time.
Here is a link to short Youtube about UMI : https://youtu.be/Wy-SNjA9Tw0
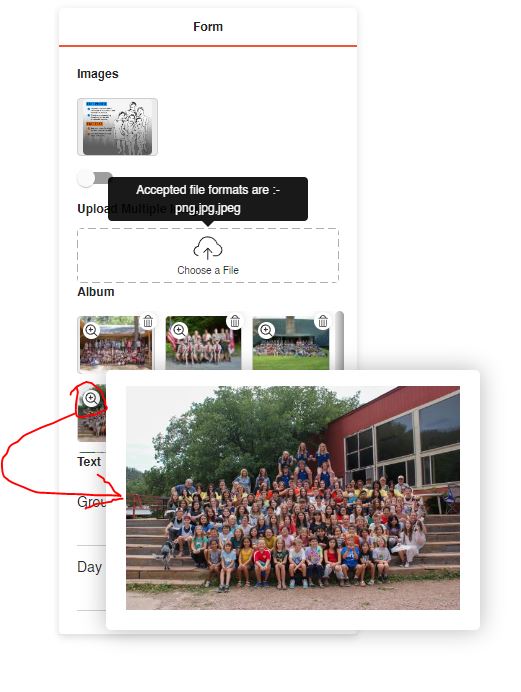
When you look at the multiple images you have uploaded into the left side of the page. You now have two new features 1. You can click on the Magnifying glass icon on the thumbnail and you will pop out a larger version for preview. 2. When you hover over an image you will see the filename of that photo
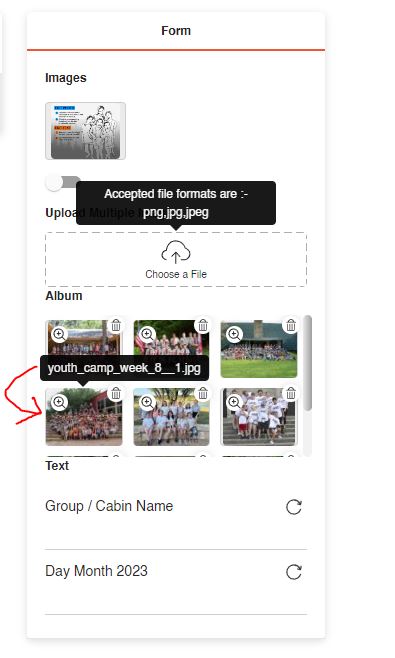
We recomend that you always import into the template on the right the top left image as that will help you remember which image you have imported. You can hover over that image and see the file name and we hope that you rename your photo file names before you import them and create your own pattern of file name that gives you the important information that you need when adding text and setting the quantity to order.
Example: if your photo is for a cabin group called Redwood and you have 12 campers in that group that you want to order photos for, you would pick the pose that you are most happy with and rename that file to: Redwood Qty 12.jpg This will help you stay organized as you upload multiple images with different group names and different quantities.
We added a field at checkout that allow you to add a cell phone number (or any after hours phone number) that we can use if needed to reach you if we see any issues with your order. Example, you are in Florida and placed a group photo order and we are working on it to ship that day and it is 4pm our time in Arizona. We notice that something might be a problem on your order and need to reach you for clarification but it is 7pm your time. Your office will be closed by that time and yet we still have 3 hours to ship your job that day and might be on hold till we speak with you. So reaching out to a cell phone when needed can really be a big help.
We have moved the location of where you choose how you want your photos shipped to you to the Check Out section. Your choices are: 1. Two Day Air Delivery to Camp. 2. One Day Air Delivery to Camp 3. Home Ship to Campers Homes.
Note: you have order at least 40 photos total in order to have the Two Day Air shipping be free.
If you have a message on your order, you can leave a message in the Delivery Date Information Yellow Box where it says, “Add any order comments below….” These will print on your order in RED letters as well as on our Sales Order in a prominent place for us to clearly see.
When you go to My Account (top left when logged in ) you can go to your Recent Orders and click the reorder link and make a new order from the old order. You will want to delete items on that order that you do not want to reorder and update from the original quantities all the quantities of line items that you want to reorder. If you found that you need two more photos of a previous order and you access the previous order to make a new order, make sure you change the quantities that you want and delete any line items that you do not need to reorder.
Now you can send us your Home Order Spreadsheet if it was not ready when you placed your photo order by going to My Account (top left when logged in ) and go to View Order on the order the spreadsheet needs to be attached to, and scroll down and you will see the Choose Files button and you can add your spreadsheet and Submit it and we will get it and it will be attached to your order.
Many customers have expressed concern that when they are placing their photo into the border that it does not look as high resolution as the original (the image placed is a low res screen view only that allows the site to work faster over the internet). Now we have on the left side of the window on the Design Tool a toggle button that allows you to switch the existing photo in the template to high resolution original (it also resets the original position of the image placed into the template). The best use of this feature is for verification and switch back to the low resolution image to finish designing your layout and ordering.
Adding a name to your line item for reference allows you to look back on your orders and identify a group photo by a reference in addition to recognizing the photo.
Now you can add a Job name to each order you place so you can reference each order later by that Job Name.
Soon we will have a tab on the home page called Downloads that allows you to download videos and other files like Home Order Spreadsheet Template.
