FAQ's
How to Take Better Group Photos
1. Get Closer
2. Get Closer
3. Get Closer
Your goal is to get the largest head size of the people in the group.
This is your main composition goal when taking group photos. When you learn to maximize the whole photo frame you will automatically be making the head sizes larger.
Most cabin group photos are small enough that it is not necessary to maximize the subjects, but larger groups need your planning to make the subjects all viewable.
If you have a large group you will want to make more rows of subjects and that will allow you to get closer to them , then you get larger head sizes. One long row of subjects means you have a lot of wasted image area for foreground and sky. One row of 30 people should be made into 3 rows of 10 people and now you are much closer.
With three rows of 10 it is better to make front row 8, second row 10 and third row 12 people. This is still 30 people, but making your rows slightly wider as you go to row 2 and 3, the rows in the camera will likely image as the same width. Larger groups into the 100's will need many more rows each getting slightly wider than the one closer. Bleachers work well for very large groups.
Some cameras allow you to change the Aspect Ratio in your camera/smart phone to match the Aspect Ratio of the online window opening before taking your group photos. Your manual should have a section on Image Format or Aspect Ratio or email Jeffb@groupimaging.com with the brand and model of your camera and I will send you the instructions. Put Aspect Ratio in the subject line please.
NOTE: Be careful, if you camera allows you to change the Aspect ratio it should mask off the LCD display with black to show you what is going to be in the photo, but some cameras do not update the viewfinder where you look with your eye above the LCD monitor on the back of the camera. So if you change your Aspect Ratio verify that your viewfinder does or does not also update. Some Canon cameras put vertical lines that you can see in the view inder some do not.
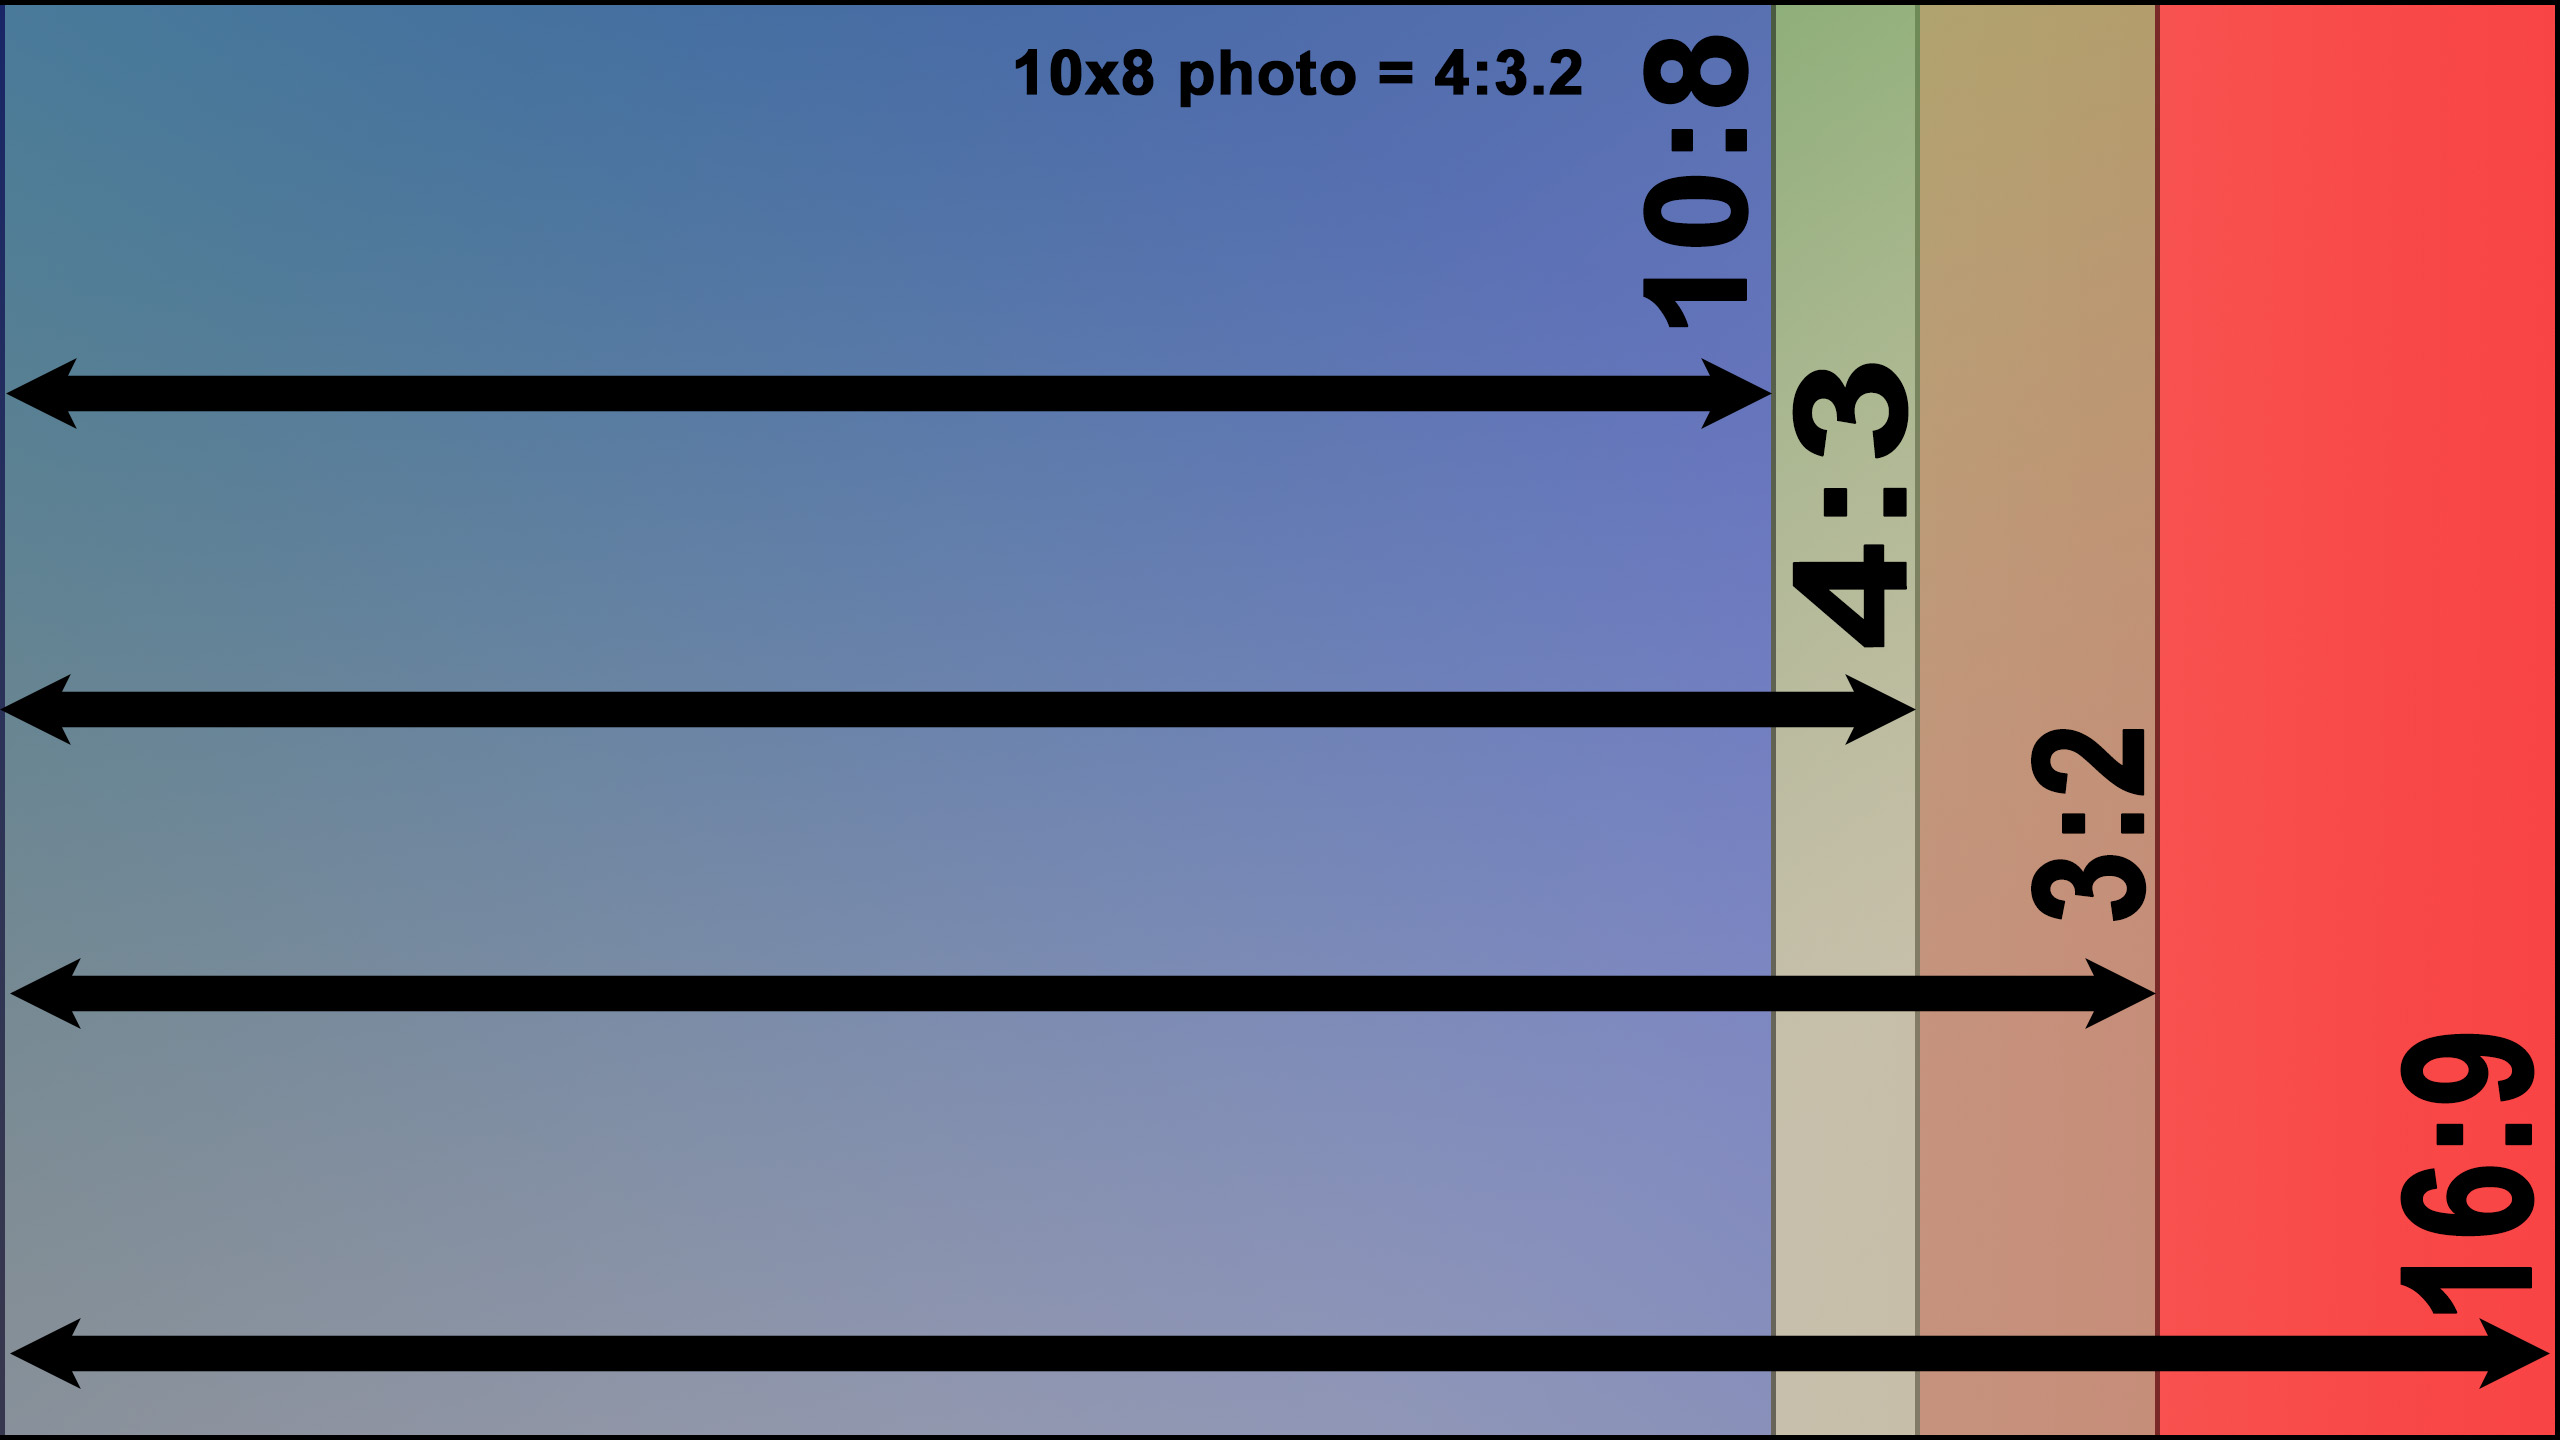
To understand Aspect Ratios the first number is the width and the second number is the height. They are expressed as a ratio with the lowest common denominator. So, a 3:2 ratio is exactly a 12:8 ratio or simply an image that is 12" wide and 8" tall. When we have a bordered 8x10 photo the opening is approx. a 3:2 ratio. When we have an 8x10 with no border the closest camera ratio is 4:3, which is 10:7.5 so you have to enlarge your image online to about 10 5/8" to get the height to 8" which means you crop off at total of 5/8" on the width in a non bordered 8x10.
When you place your group photo into our templates you may experience that you need to expand your image to make it fill that area where your photo goes. This is because of several factors that result in a mismatch in height x width (Aspect Ratio of the Photo) of the image you took with your camera and the height and width of the online window .
See this Video that is in our How To videos: https://youtu.be/YnJ8Go49LrE
The result can be that you have to enlarge your image past the width of the window online in order for your group photo to fill the opening from top to bottom.
This can result in the possibility that some of the people on the left and right would be cut off if you continue to expand the image so that the image fills the opening from top to bottom.
Solution:
The most common camera Aspect Ratio is 3:2 (not an option on Iphone, only 4:3 and 16:9) which is exactly 12:8 (12" x 8") which is what you want to have your camera set to for our bordered 8x10 photos. A 3:2 Aspect Ratio is best for our bordered prints. It appears that many digital cameras default to 3:2 Aspect Ratio.
The 4:3 Aspect Ratio is what you want when you are printing a 8x10 group photo that does not have a border on it.
Here is a comparison of common Aspect Ratios in cameras. in each width below the height is still 8".
3:2 (12x8") 4:3 (10x8") 16:9 (14x8"):
The Aspect Ratio for our prints can vary from:
1. 10x8 photos with no border:
Use 4:3 Aspect Ratio in your camera for Full Frame for No Border layouts that have an Aspect Ratio of 10:8 ( very close to 4:3.2) so the best camera setting is an Aspect Ratio of 4:3 (4:3.2 is not a camera option). If your camera is not able to change from 3:2 Aspect Ratio then just make sure you leave some empty space on the left and the right.
 This is the Aspect Ratio of an 10x8" photo (4:3 is best setting to use in camera or smart phone.
1. 10x8 photos with border:
Use 3:2 Aspect Ratio
Our Bordered Templates have an Aspect Ratio of the opening for your photo very close to 3:2 Aspect Ratio
The border is 8x10 Aspect Ratio to the outside, but the area for your photo is approx. 3:2 so using that setting in your camera/smart phone is the one to use.
3. 12x8 photos with no border:
Use 3:2 Aspect Ratio in your camera/smart phone if available.
Secondary Optons:
Use 16:9 and make sure you leave some empty room on the left and right sides. You can fill the frame almost all the way to the top and bottom.
Use 4:3 and make sure you leave some empty room on top and bottom. You can fill the frame if using 4:3 almost all the way to the left and right.
4. 14x8 photos with no border:
Use 16:9 Aspect Ratio in your camera/smart phone or us 3:2 Aspect Ratio and leave some empty room on the left and right.
